How to Use a 2 Station Silk Screen Printing Press for Multi-Layer Printing
Setting up the Silk Screen Printing Press
Silk screen printing is a popular method for creating high-quality prints on various surfaces, including fabric, paper, and plastic. One of the key tools used in silk screen printing is a printing press, which helps to ensure accurate and consistent prints. In this article, we will discuss how to use a 2 station silk screen printing press for multi-layer printing.
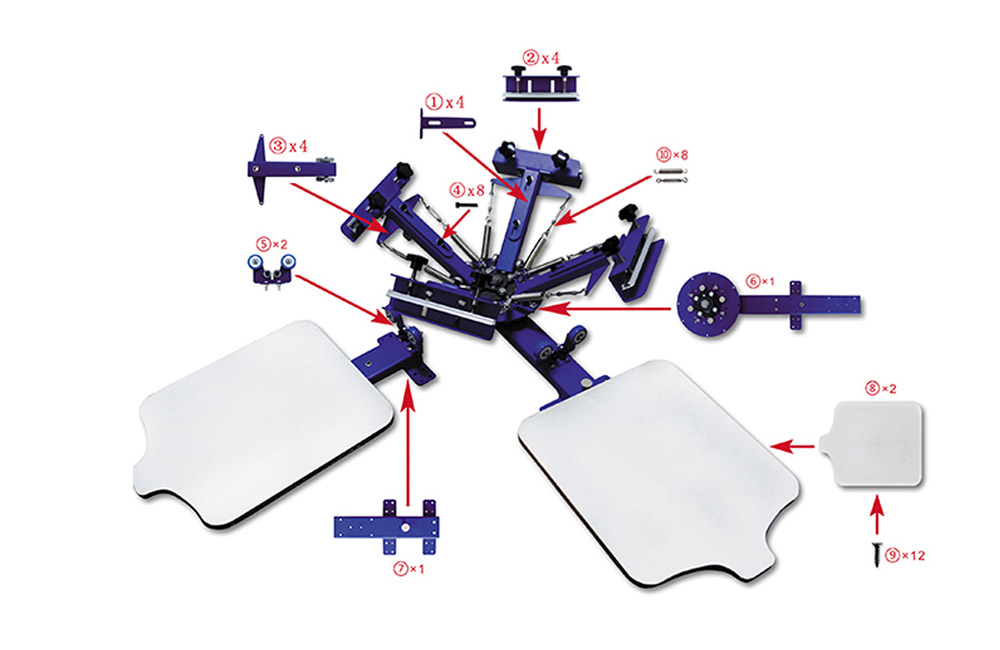
Setting up the silk screen printing press is the first step in the printing process. Before you begin, make sure you have all the necessary materials and equipment, including the printing press, screens, squeegees, ink, and substrate. Start by assembling the printing press according to the manufacturer’s instructions. Make sure all the components are securely in place and that the press is level and stable.
Next, prepare your screens for printing. Attach the desired stencil or design to the screen using a light-sensitive emulsion or a direct emulsion method. Allow the emulsion to dry completely before exposing the screen to light. Once the screen is ready, place it in the printing press and secure it in place using the clamps or hinges provided.
Now, it’s time to set up the printing stations on the press. A 2 station silk screen printing press has two printing stations, which allows you to print multiple colors or layers in one pass. Position the screens in each station so that they align correctly with the substrate. Adjust the height and angle of the screens as needed to achieve the desired print placement.
Before you start printing, make sure to test the registration of the screens by doing a test print on a scrap piece of substrate. This will help you ensure that the screens are properly aligned and that the design will print correctly on the final product. Make any necessary adjustments to the screen position or angle before proceeding with the actual printing.
Printing with a 2 station silk screen printing press for multi-layer printing requires careful coordination and timing. Start by applying ink to the first screen and using a squeegee to pull the ink across the stencil. Make sure to apply even pressure and maintain a consistent speed to achieve a clean and crisp print. Once the first layer is printed, move the substrate to the second station and repeat the process with the second screen and ink color.
To achieve multi-layer prints with precise registration, it is important to allow each layer to dry completely before printing the next layer. This will prevent smudging or bleeding of the colors and ensure a professional-looking finish. You may need to use a heat gun or drying rack to speed up the drying process between layers.
In conclusion, using a 2 station silk screen printing press for multi-layer printing can produce stunning results with vibrant colors and intricate designs. By following the steps outlined in this article and practicing good technique, you can create professional-quality prints on a variety of substrates. Experiment with different colors, textures, and techniques to unleash your creativity and take your silk screen printing to the next level.
Pre: Understanding Platen Size and How It Affects Screen Printing Results
Next: How to Print Detailed Designs with a 4 Color Screen Printing Machine
Tags: