How to Set Up a Small-Scale Screen Printing Operation at Home
Equipment Essentials for Home Screen Printing
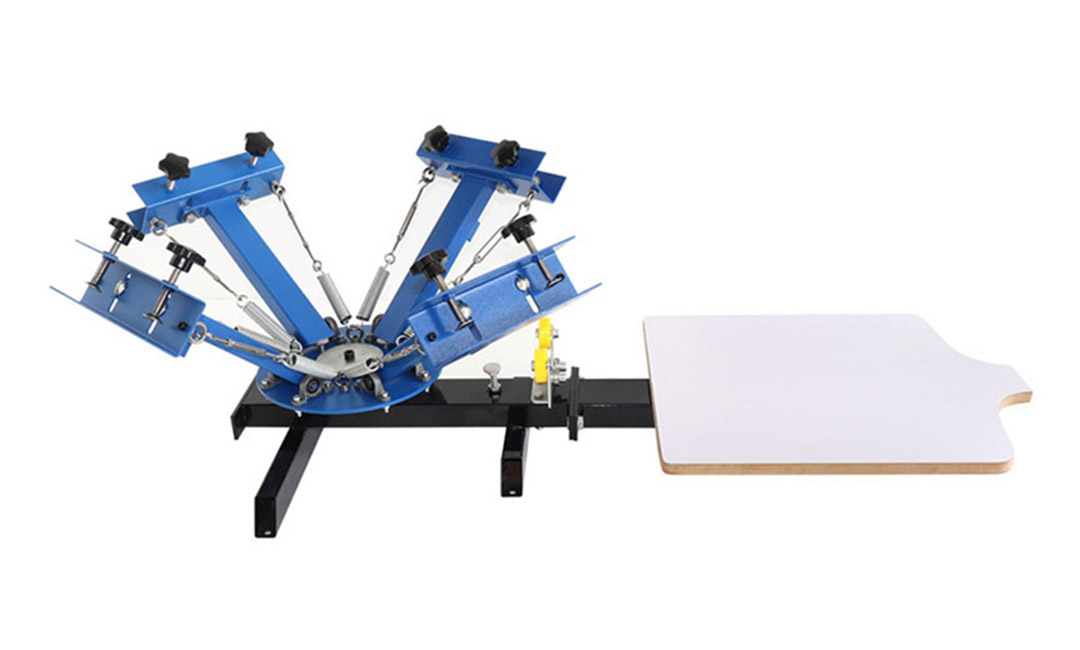
Setting up a small-scale screen printing operation at home requires careful consideration of the essential equipment that will facilitate the process. To begin with, the most critical component of any screen printing setup is the screen itself. Screens are typically made of a fine mesh stretched over a frame, and they come in various sizes and mesh counts. The mesh count determines the level of detail that can be printed; for instance, a lower mesh count is suitable for thicker inks and bold designs, while a higher mesh count is ideal for intricate details and fine lines. Therefore, selecting the appropriate screens based on the intended designs is paramount.
In addition to screens, a quality squeegee is indispensable for the printing process. Squeegees are used to push ink through the screen onto the substrate, whether it be fabric, paper, or another material. They come in various sizes and hardness levels, and choosing the right one can significantly impact the quality of the print. A softer squeegee is often better for detailed designs, while a firmer squeegee can be more effective for larger areas of color. Thus, investing in a few different squeegees can enhance versatility and improve overall results.
Moreover, the choice of inks is crucial in achieving vibrant and durable prints. Water-based inks are popular for their ease of use and environmental friendliness, while plastisol inks are favored for their opacity and durability. Each type of ink has its own application techniques and curing requirements, so understanding these differences will help in selecting the right ink for specific projects. Additionally, having a variety of ink colors on hand allows for greater creativity and experimentation in design.
To facilitate the printing process, a reliable exposure unit is necessary for transferring designs onto the screens. This equipment uses light to harden the emulsion on the screen, creating a stencil that allows ink to pass through in specific areas. While professional exposure units can be expensive, there are DIY options available that can be constructed using UV light sources. Regardless of the method chosen, ensuring that the exposure unit provides even and adequate light is essential for achieving high-quality prints.
Furthermore, a drying rack is an important addition to any home screen printing setup. After printing, the items need to be cured properly to ensure that the ink adheres well and is resistant to washing. A drying rack allows for efficient organization and drying of printed items, preventing smudging and ensuring that each piece is ready for use or sale. Additionally, having a designated workspace that is well-ventilated and equipped with adequate lighting will enhance the overall printing experience.
Lastly, it is advisable to invest in cleaning supplies to maintain the equipment and ensure longevity. Screen cleaning solutions, brushes, and solvents are essential for removing ink and emulsion from screens and squeegees after each use. Proper maintenance not only prolongs the life of the equipment but also ensures that the quality of prints remains consistent over time.
In conclusion, establishing a small-scale screen printing operation at home involves careful selection of essential equipment, including screens, squeegees, inks, exposure units, drying racks, and cleaning supplies. By investing in quality tools and maintaining them properly, individuals can create a productive and efficient workspace that fosters creativity and allows for the successful execution of screen printing projects.
Step-by-Step Guide to Preparing Screens
Setting up a small-scale screen printing operation at home can be an exciting venture, particularly for those interested in art, design, or entrepreneurship. One of the most critical steps in this process is preparing the screens, as they serve as the foundation for transferring your designs onto various materials. To begin, it is essential to gather the necessary materials, which include screen frames, mesh fabric, emulsion, a scoop coater, a light source for exposure, and a washout station. Having these items on hand will streamline the preparation process and ensure that you are ready to create high-quality prints.
Once you have assembled your materials, the first step is to stretch the mesh fabric over the screen frame. This requires careful handling to avoid wrinkles or bubbles, which can affect the quality of your prints. Begin by placing the mesh over the frame and securing it with staples or adhesive, ensuring that it is taut and evenly distributed. After the mesh is firmly attached, it is crucial to inspect the screen for any imperfections, as these can lead to unwanted marks on your final product.
Next, you will need to prepare the emulsion, which is a light-sensitive liquid that will allow you to create your design on the screen. It is advisable to work in a dimly lit environment to prevent premature exposure. Carefully mix the emulsion according to the manufacturer’s instructions, ensuring that it is well combined. Once mixed, use the scoop coater to apply a thin, even layer of emulsion onto the screen. This step is vital, as an uneven application can result in inconsistent prints. After coating, allow the screen to dry in a dark, dust-free area, as any exposure to light can ruin the emulsion.
After the emulsion has dried, the next phase involves exposing the screen to light. To do this, you will need a transparency film with your design printed on it. Place the transparency on the screen, ensuring that it is aligned correctly. Then, position your light source above the screen, following the recommended exposure time provided by the emulsion manufacturer. This step is crucial, as the light will harden the emulsion in areas not covered by the design, creating a stencil for your print.
Once the exposure time has elapsed, it is time to wash out the screen. Using a gentle stream of water, carefully rinse the screen to remove the unexposed emulsion. This process reveals your design, which will allow ink to pass through during printing. It is important to ensure that all unexposed emulsion is washed away, as any residue can lead to blockages during the printing process. After rinsing, allow the screen to dry completely before proceeding to the next step.
Finally, once the screen is dry, it is ready for use. You can now set up your printing station, ensuring that you have all necessary materials, such as ink and squeegees, within reach. By following these steps meticulously, you will have successfully prepared your screens for printing. This preparation is essential for achieving high-quality results and will significantly enhance your screen printing experience. As you gain more experience, you may find ways to refine your technique, but mastering the basics of screen preparation will provide a solid foundation for your small-scale screen printing operation at home.
Tips for Choosing the Right Inks and Materials
When embarking on a small-scale screen printing operation at home, selecting the right inks and materials is crucial for achieving high-quality results. The choice of ink can significantly influence the final product, affecting not only the vibrancy and durability of the print but also the ease of application. Therefore, it is essential to understand the various types of inks available and their respective properties. Water-based inks, for instance, are popular for their eco-friendliness and ease of cleanup. They penetrate the fabric fibers, resulting in a soft feel and vibrant colors. However, they may require a longer drying time and can be less effective on certain materials, such as polyester. Conversely, plastisol inks are widely used in the industry due to their versatility and durability. They sit on top of the fabric, providing a rich color payoff and excellent wash resistance. While they require a heat source for curing, their ease of use makes them a favorite among beginners.
In addition to ink selection, the choice of materials is equally important. The type of fabric you intend to print on will dictate the kind of ink you should use. Cotton, for example, is highly compatible with both water-based and plastisol inks, allowing for vibrant prints. On the other hand, synthetic fabrics may require specific inks designed to adhere properly to their surfaces. Therefore, it is advisable to conduct tests on various materials to determine the best combination of ink and fabric for your projects. Furthermore, the quality of the screen mesh is another critical factor that can impact the outcome of your prints. A finer mesh count allows for more detailed designs, while a lower mesh count is better suited for bold, solid colors. As a general rule, a mesh count of 110 to 160 is ideal for most textile printing applications, striking a balance between detail and ink deposit.
Moreover, the choice of emulsion used in the screen preparation process cannot be overlooked. Emulsion acts as a light-sensitive layer that allows for the transfer of your design onto the screen. There are various types of emulsions available, each with its own sensitivity and exposure time. For beginners, a dual-cure emulsion is often recommended due to its ease of use and versatility across different printing applications. It is also essential to consider the tools and equipment you will need for your operation. A reliable squeegee is vital for evenly distributing ink across the screen, while a sturdy printing press can enhance precision and consistency in your prints. Investing in quality tools will not only improve your workflow but also contribute to the overall quality of your finished products.
As you set up your small-scale screen printing operation, it is beneficial to keep a well-organized workspace. This organization will facilitate a smoother printing process and help you maintain a clear overview of your materials and supplies. Additionally, maintaining a clean environment will prevent contamination of inks and screens, which can lead to subpar prints. Finally, do not hesitate to experiment with different inks and materials to discover what works best for your specific needs. The world of screen printing is vast, and finding the right combination can lead to unique and high-quality results that reflect your creative vision. By carefully considering your choices in inks and materials, you will be well on your way to establishing a successful home-based screen printing operation.
Pre: Best Screen Printers for Small Businesses on a Budget
Next: Choosing the Best UV Lamps for Efficient Screen Printing Exposure
Tags: